Routine & Progression For Handstand
Hello to all,
Welcome to this new article dedicated to the Handstand !
After writing an article on"Successfully holding in Handstand" today we are going to discuss the routine to be able to progress in this essential figure of Street Workout 💪
Do you know anyone who wouldn't like to be able to stand on their hands anywhere and anytime? Not sure. It's not just a matter of snapping your fingers to get there, it takes effort and a lot of time.
I have already done a complete article on the Handstand which I highly recommend and this article aims to complement it but more importantly to provide you with something very applicable that takes almost all the thinking out of it and allows you to take action immediately with confidence in the direction you are taking.
ROUTINE FORCE
There are some very common mistakes when learning the Handstand slow down progress enormously. This can be demotivating or completely discouraging.

One of them is to want to stand on one's hands when one does not yet have the strength in one's arms, shoulders and the rest of the body to simply hold one's head upside down without having to manage the balance yet.
In my opinion, if you want to do it right, limit the risk of injury, and lay a solid foundation that will serve for everything else, you'll first need to be able to stand upside down, with your back or face to the wall, for at least 20 to 30 seconds.

The first routine is designed to reinforce this goal. As a prerequisite for this one, a dozen clean push-ups are needed and 5 or more pull-ups + dips wouldn't go amiss, as would some overall strengthening. However, this is not absolutely necessary either if there is really only the Handstand However, it's not absolutely necessary either if you're really only interested in the "clean and jerk" and in that case, the second routine in this article will be of particular interest to you.
JOINT WARM-UP FOR ROUTINES
As aspecific warm-up, it is important to prepare your wrists and shoulders. Here are some small exercises that I advise you to do systematically before each session to improve your performance, this will also reduce the risk of injury.

EXERCISES TO CONTROL YOUR HANDSTAND
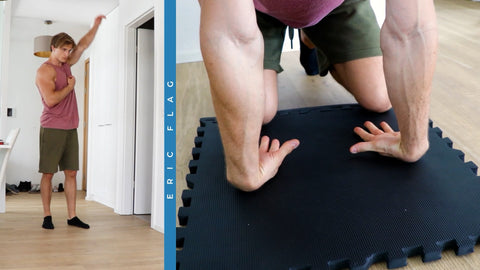
EX 1 : PUSH-UPS IN PIKE

First exercise: Pike Pushups on the floor for 3 sets of your maximum minus 2, meaning you will have to stop about two pushups before failure, which should allow you to keep a clean execution until the last repetition. You can take between 1 min 30 and 3 minutes of rest between 2 sets. The goal is to be rested enough to perform well on each set, not to be sweating or out of breath non-stop.
To simplify your push-ups, you need to move your feet further back and conversely to make them more difficult.


I advise you to choose a position that is hard enough so that you can't do more than 10 reps in a row. However, make sure you always dive forward and keep your elbows at your side, even if it is much harder that way. Alternatively, you can also replace these push-ups with dips if you want or alternate between the two from week to week.
EX 2 : PROGRESSION HANDSTAND ASSISTED

Second exercise: the Progression of the assisted Handstand that you will begin in pike with the feet slightly in height then that you will pose more and more high then, for example at the height of hip against a wall until finally having the body right in front of the wall and sufficiently close to him.
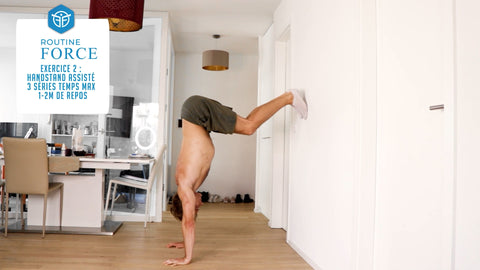
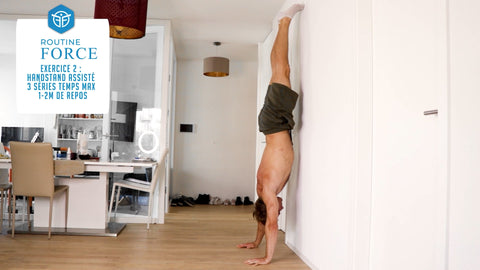
Here you can do 3 sets of your maximum time while still having the energy to return to the floor safely. Once you can hold a position solidly for 30 seconds in a row for your first set of the day, then you can move on to a more difficult progression in your next workout.
EX 3 : FROGSTAND

Third exercise: the Frogstand which will give you a first small balance to manage and for which you will do 2 or 3 more sets of your own maximum time. The more you squeeze your knees high against your arms, the more difficult the exercise will become.

EX 4 : HOLLOW BODY CIRCUIT
The fourth exercise is an abdominal wall circuit that will help you strengthen your abdominal belt to hold the Handstand. You start with the Hollow Body position where you always want to have your lower back on the ground and hold it correctly to the maximum before moving to the Hollow Body on the side, always holding your maximum time before changing sides without resting and starting again to finally finish with the Superman on the stomach, which you will hold to your maximum and then rest for 1 to 2 minutes before starting again for two or three circuits in total.


EX 5 : PIKES + SHOULDER BLADE DIPS

Finally, the fifth exercise is a double exercise that will serve to reinforce your control over the correct position of your shoulder blades. You will do a series of your maximum scapula push-ups in pike, then scapula dips without resting between the two, keeping 1 to 2 good seconds of maximum contractions at the top of each repetition. You can then repeat this double exercise a second time if you wish to conclude this routine.
You can do it several times during the week, but it will probably be around twice if you incorporate other sessions where you work the muscle groups that are not involved in this one, like your back and legs so that you stay balanced. And so, as soon as you're able to hold for 20-30 seconds straight against the wall, you can start working seriously on your Handstand to the wall, you can start working on your core.
FREQUENCY AND PROGRAMMING FORCE ROUTINE
BALANCE ROUTINE V1 : THE WALL
The wall is much less exciting, more tiring, requires more effort and is less fun... but ignoring the wall when you want to learn to stand on your hands is a bit like ignoring your calories completely when you're trying to gain muscle or lose fat for the first time. It can totally work, but it will probably be a fluke and hard to replicate.
To get your Handstand quickly, you're going to want to focus the vast majority of your time very close to your wall (so I hope you get along with it).
This balancing routine is much simpler than the first one, with concretely only 1 exercise, but it will not be easier and it will evolve with your level. The following exercise is an attempt at Handstand assisted with the wall! But be careful, with a very special technique.

First, you would like to be able to alternate sets between Handstand face and back to the wall, and the latter may be new to you, so you'll need to familiarize yourself with it first, as it's often scarier than the former and also requires more mobility. Now let's move on to technique:
Once in position, what we tend to do naturally is to kick to get off the wall and try to find the balance. Again, it's random to do this... Balancing on your hands is like balancing on your feet, when you are standing and you are going to fall forward, you instinctively push on your toes and the front of your feet. On the hands it's exactly the same, we have to constantly be pushing on our fingers, releasing the pressure and eventually pushing on the bottom of our palms.


You should move the rest of the body to try to keep the direction of mass above the center of the handsor slightly closer to the fingers. Alternatively, you can train your body on parallel bars, which have the advantage of being less painful for the wrists. Handstand on parallel bars which have the advantage of being less painful for the wrists, as well as allowing you to manage both forward and backward imbalances, which can make the Handstand easier when you are used to it.
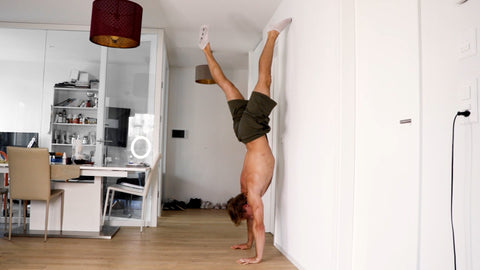
 Movement realized on the wooden parallettes
The starting position for this is going to be to keep your legs straight up to your foot and have one of them against the wall. Likewise, you want to get as tall as possible by pushing up on your shoulders and you also want to actively contract your abs, glutes and legs. From there, as we've seen, you're going to want to gradually move your center of mass away from the wall and toward your hands, which you can do by moving your shoulders and upper body, as well as moving your second leg away from the wall.
You want to do this slowly and in control, until you reach the point where you feel your foot start to want to come off the wall by itself. This is where your hands will come into play, as you will continue to push your foot off as gently as possible and at the same time, you will push on your fingers or the palms of your hands to bring you back against the wall in the other direction. I suggest you learn to bend your fingers at the middle phalanx, which will allow you to push on it with more force.


This method will make your brain understand how everything works and it will help you consciously create your balance rather than trying to find it randomly. From there, with each series and session, you will manage to get closer and closer to the balance point and you will learn to better manage the pressure on your hands so that you don't go straight back against the wall, but to start by holding your balance a little bit. Ideally, you want to avoid falling off the wall. HandstandIdeally, you should not fall off the wall, but rather force your hands forward and backward to always come back against the wall.
To get back to this routine, I would advise you to do 4 to 8 alternating sets with your back to the wall and front to the wall for 10 to 30 seconds each, which will consist of one or more attempts in a row in order to create your balance. You can do more than 8 sets per session, as long as you feel that it is still productive despite the accumulated fatigue. You should quickly improve in this way and as soon as you manage to stay off the wall for 3 seconds or more per workout, you will be able to evolve the routine by adding a second exercise after this one, which will be to learn to jump in Handstand.
BALANCE ROUTINE V2: LEARNING TO JUMP
The jump from Handstand is very technical and therefore it will also require a lot of training so that you learn to dose it properly. Using the wall will not only limit fear and falls, but it will also serve as a reference point. Ideally, you'd like to split your attempts roughly evenly between jumping too much and not enough to optimize your learning. The further your hands are from the wall, the more it will allow you to let your legs go behind to balance, but the more intimidating it will be too, so move away gradually.
Since we're working on technique here, we won't start with sets and reps, but rather a time frame to work on it, for example 5 to 10 minutes during which you do a few tries before resting at the feeling and starting again when you're fresh and focused enough to give your best.
In fact, if you feel too tired from your sets against the wall to be effective on the jump afterwards, you can start your workouts with the jumps before finishing with the wall.
BALANCE ROUTINE V3: FREE ATTEMPTS HANDSTAND

After enough sessions, you will have built up everything you need to make it worthwhile to try Handstand without the wall!
Again, you can set yourself a free time to try, for example 5 to 20 minutes as long as you don't regularly hold your balance for several seconds in a row when you throw the Handstand. I recommend always ending your sessions with several assisted sets with the wall to continue to keep a long total time with your head upside down each session. If you follow a method like this, I am confident that you will make steady and motivating progress and it is only a matter of weeks before you get there.
TRAINING FREQUENCY HANDSTAND
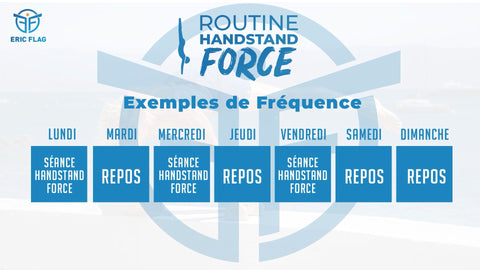
In terms of the frequency and scheduling of this balance routine, the less experience you have in Handstand and in sports in general, the more you can train it. Similarly, the more you have a busy workout routine or other athletic goals on the side, the less you can work it. Still, doing this session 3 times a week is a good minimum to aim for in my opinion, as the Handstand requires a lot of practice at first. But you can very well go up to 5 or 6 times a week depending on the parameters I mentioned before.

Listening to your body and giving it the rest it needs is the most important thing here, if you want to train Handstand on days when you have other sports activities, do it before, when your brain and body are still fresh, because that's how you will make the most progress. And the more experience you have, the less tired you will be. As for the rest of the activities, to finish with the frequency, it's really the total time of balance training per week that is most important, so it's better to train 3 times 35 minutes rather than 6 times 15 minutes, which will require twice as much time to warm up.
Here is a summary sheet that could be used:


And if you want a complete program up to 5 months of optimized video or bodyweight routines that also includes tricks like the L-sit or Muscle up, my Street Workout Evolution program will be of great interest to you.
You can also view the routine and progression video handstand.
That's it for this article, I hope you enjoyed it :)
In the meantime, work hard, take care of yourself!
See you soon 😄
Eric Flag

1 comment
Hello Eric,
Thank you for these tips and exercises for learning Handstand.
of Rambures
Leave a comment
This site is protected by reCAPTCHA, and Google's Privacy Policy and Terms of Service apply.