How to balancehandstand ?
Hi there 👋
After having written an article on the figures of the Street Workout, we will focus today on one of them: the Handstand.
We will see the 3 main aspects that make up the movement in order to obtain a Handstand of the most correct.
On the agenda of this article:
- The positions of the hands
- The best ways to get in and out of this position
- Mistakes to avoid
- Routine Handstand
- Additional progressions
By the end of this article, you'll know how to balance!
Let's go 🔥
How to balance? A blend of strength and technique

The Handstand website is mainly made up of 3 elements, and the first 2 you'll need to focus on are: strength and balance.
You'll need a minimum of strength if you want to stand upside down on your hands, as well as a good dose of balance if you want to hold on without any help.
Having a lot of strength or balance will compensate for a lack in the other element. The third dimension of Handstand is alignment.
The alignment
There are 2 types ofHandstand : the Handstand banana with curved back and the Handstand straight with upright body.
The banana is the version that's a little easier to obtain and surely the first one you'll get.
For a straightHandstand , you'll need to contract your whole body. This version is safer and based on balance, which makes it less tiring and allows you to hold it longer. A straight Handstand will teach you the correct body position you'll need for many other Street Workout moves, such as the back lever or the plank.
When learning to move, it's important to be aware of keeping your body upright, especially when working against a wall.
Just before getting into the details, you should not neglect the warm-up because the Handstand will put your body, shoulders and especially your wrists to a severe test.
The warm-up of the Handstand

I particularly recommend warming up your wrists and shoulders, which I always do before every workout.
At the very beginning, you'll need a minimum of strength to be able to work seriously on the first main position. Handstand against a wall is ideal for building strength and getting used to having your head down. Your shoulders and wrists will gradually get used to it, without any risk of injury.

Strength and balance exercises
To start finding your balance point and building strength, the Pike position Handstand is ideal. You can gradually raise your feet to increase the difficulty, until you've raised them all the way up against a wall.

Another very good exercise that I did a lot of in my early days is the Frog Stand, which will require a little more strength and balance.
Squeeze your knees tightly against your arms at the start to make the exercise easier. Set yourself the goal of lasting between 10 and 30 seconds in a row, which will be a good start 💪

To go further in strength and balance. You can do the Crow Stand with your knees higher and your arms straight.
But be careful, it's already more advanced and it pulls well on the wrists!

Positioning of the hands on the ground
You'll want them shoulder-width apart or a little wider. Then, don't clench your fingers, but instead spread them far enough apart to increase your stability.
Lastly, I recommend bending your fingers before you start, as shown in the image below. Once balanced, you'll constantly alternate between pushing on your fingers and releasing the pressure to stay in position.

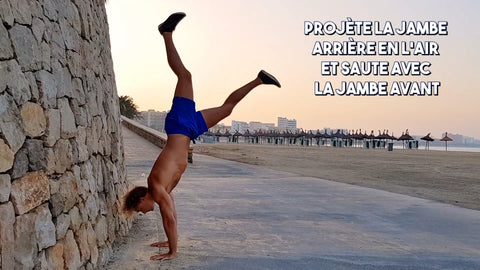
Jump with your back to the wall to become familiar with the Handstand
You'll throw one of your back legs directly onto the wall, and the second leg will do the same a few moments later. Be careful to leave enough space between your hands and the wall at the start, and to time your jump so that you land directly on your feet.
The wall is ideal to start gradually to become familiar with this figure of Street Workout.


The Handstand with its back to the wall
Once you're holding upside down, you'll immediately want to work in the best possible position. You'll need to tighten your feet, buttocks and abs as much as you can to keep your body straight and avoid digging into your lower back.
Make sure you push on your shoulders all the way, as if you were trying to get them as close to your ears as possible.


Once you've got a solid enough position, I recommend working until you've got it. a good minute in a rowIf you're having trouble, don't force it.
Holding this position for 30 seconds will already be very effective, repeat this 2 or 3 times.
Let's go 🔥⌛️

Getting off the wall
Two ways to proceed:
- The first is to push yourself off the wall with your foot before your hands take over to keep your balance.
- The second is to put as little pressure as possible on your foot anduse only your hands to get off the ground. To do this, you're going to want to push hard on your fingers, which will gently pull you backwards, away from the wall and back onto the ground with both feet.
The fear of falling
When you start doing Handstand without walls, it's important toeliminate any fears you might have, especially about falls.
That's why you first have to learn how to fall without hurting yourself. There are different ways of getting out of a Handstand :

If you do it on soft ground, you can tuck your head in and roll onto your back instead of your neck, or you can decide to bridge from your Handstand. This is not necessarily ideal, as it's more impressive.
The exit I recommend is to simply rotate the body to one side before falling on your feet.
Tip: Test yourself to see which side you prefer. You'll keep this side in your head when making Handstand.
Now that you know how to fall, let's focus on that famous position!
Jumping in Handstand
I always recommend starting with your hands on the ground, as we saw earlier, rather than projecting yourself upright.
A major step will be learning to jump just enough, and finding the right balance point. You'll find it as you go along.

As a general rule, I recommend looking slightly above the hands rather than trying to pull the head in (which can complicate balance).
Here's what to do and what not to do:
Mistakes to avoid and my advice
- First of all, you should start with your shoulders above your hands and not behind them, so that they are already close to their final position.
- You'll also direct the movement with your hips, not your feet. The hips should arrive above the shoulders before the feet, and ideally they should stay there.
- Finally, keep your hips parallel to your hands for as long as possible and twist only when you fall.
Now let's see how to keep the balance! 🤸♂️
Hold on tightly Handstand
My best advice is really to train it again and again every day, if you can.
Repetition is the only way to get it and improve it. I'd also advise you to make max attempts quite often, for example once every morning and evening against a wall.

When you try to separate yourself from the wall and balance on your own, you should train every day if possible. Incorporate this exercise into your workouts in the form of defined time sessions.
For example, devote 20 minutes at the beginning of your sessions to practicing jumping and holding a Handstand. This doesn't mean 20 minutes non-stop. To succeed, you need to be fresh. If you miss several times in a row, rest for a while so you're ready to go again.
Also combine working with a wall and without, for example, do 10 minutes of each to accumulate enough jump attempts and time spent upside down.
Don't forget that falling is a last resort. As long as you're up there, fight to stay there!
A few techniques to help you get there: avoid stepping on your hands to avoid falling - it's a bad habit. If you're going to fall forward, push hard on your fingers to rebalance yourself. You can also try the Hollow Back Handstand, but that's more advanced.

To avoid landing on your feet in your starting position, learn not to push too hard on your fingers and to release the pressure at the right moment.
Try to keep your weight in the middle, or even a little forward of your hands, and not on your palms. If you lose your balance, there are two ways of staying aloft by compensating with strength, but they are more advanced. Either bend your arms and pump your hands to come up, or keep your arms straight and come up, slowing your descent into the plank. These techniques quickly become very difficult.
Two more tips to help you find and keep your balance:
1. If you have someone to help you, ask them to stretch out their arms on either side of your legs and gently push on the other side to help you find your balance point. This may also reduce your fear of falling.
2. If you find something at foot level, such as a pull-up bar or a ceiling that's not very high, use it to push against and find your balance before releasing the pressure.
How can you improve your mobility?
The head-down dog posture is great for improving mobility. It can be performed against a wall or on the floor. There's no need to keep your legs straight, as it's not your ischials you're trying to stretch.
Never dig your back in and gently push yourself out of your comfort zone.


You can also train the Hollow body position, which is what you're aiming for at Handstand, except that you train it on the floor and on your back.
Once again, you press your lower back against the floor, contract your abs, buttocks and legs and extend your arms behind you. This is a very good exercise , but be very careful not to dig into your back.
Here is the expected position:

There are still several important points about Handstand right. For example, having straight legs is great, but as you can see, it's not always enough 👇
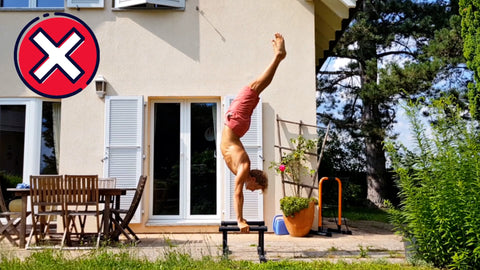
Here is the expected position:

Handstand on Parallettes
Another type of Handstand that I'm going to touch on briefly, and which will concern you all the more if you do Street Workout, is that on parallel bars.
In my opinion, it's easier to achieve than on the ground, thanks to the position of the hands, which will enable you to use even more force to counterbalance yourself backwards, as well as forwards.
To place your hands on the bars, you don't want to break your wrists in either direction, but rather aim to put the bar a little diagonally in your palm, so as to maximize contact with your hand and therefore stability.


Possible progressions Handstand
To conclude this article, let's take a look at some possible progressions.
First of all, you can play with hand positioning, such as training balances with wide or tight grips for different sensations.


You can turn your hands outwards to increase the difficulty and ease the transition to other movements, such as planks or semi-planks.


That's the end of this article, I hope you enjoyed it 😃
To go further and perfect your skills at Handstand, you'll find all the equipment you need right here 🔥
See you soon,
Eric Flag


Leave a comment
This site is protected by reCAPTCHA, and Google's Privacy Policy and Terms of Service apply.