Front Lever 8 Tips To (Finally) Get It!
Hi there, and welcome to this new article! 😄
After writing an article on"How to succeed at Back Lever ?", we're going to tackle another iconic Street Workout figure: the. Front Lever.
The Front Lever is a figure that many bodyweight enthusiasts dream of. This dream is easily entertained when you first try it and realize how impossible it seems.
That's what happened to me. It's been a long and painful road to get to where I am today. So I'm offering you this article with my top tips in the hope of saving you some time.
But without further ado, let's get to the 8 tips 💪 :
Tip 1: The correct hand/shoulder position for the Front Lever
For your hands and to hold a static position, I recommend you use what's called a"strong grip".
This involves keeping your wrists at about bar height and choosing the grip width that seems easiest to you. Often, this grip will be a little tighter than shoulder width.


Two more important points: grip the bar as tightly as you can and pull it as far as you can. Careful, don't pull it straight down, but rather down and out at the same time, as if you were trying to tear the bar apart. Go for it! The bar is safe.
This last point will enable you to activate your back even more and use all the strength you're capable of. It's the same principle that explains why you lift more weight with the barbell bench press than with dumbbells, because you can push the bar outwards, whereas with dumbbells you can only push upwards.


A neutral or slightly forward position, which allows you to contract and lower your shoulder blades, is best. This is where you'll feel strongest, as it maximizes activation of the back muscles, which will support a good part of the load while maintaining a fairly aesthetic line.


You can, of course, film yourself to get a better idea of your posture. If you're having trouble keeping your shoulders from going too far forward, it's probably because you're still lacking a little strength.
Tip 2: Use isometric progressions
Here is a list of my favorites in ascending order of difficulty.
You'll find an indication of how long you should wait before moving on to the next one:


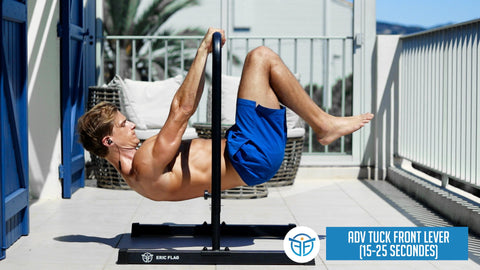


This can make the exercise much easier than a more objective position like the one-leggedAdvanced Tuck. Plus, it breaks the line of the front lever by putting the body in a spoon position, which you clearly want to avoid.
It gives a false sense of progression. If you bend your leg well, it may become easier than theAdvanced Tuck, but in reality, you've fallen into a trap.

You've got it, so I wouldn't recommend it. But if you feel like you're stuck at theAdvanced Tuckthat you've already held on to for a long time, but don't yet have the strength to hold on for the rest of your life. Straddle or the semi front lever, there are solutions.
You can try to close the gap by opening your hips even more during your Advanced Tuck. You can also mix the Straddle and the semi front lever to find an intermediate progression that you can already hold on to for a while.

These are the most important classic progressions, but there are other important and effective exercises that we will see right after 🔥
Tip 3: Work more on your back or your abs?
So far, I've mostly talked about your back. Tip number 3 involves a little debate about Front Lever
Clearly, it's the back that does most of the work and will almost always limit you. For this figure, mastering suspended leg raises is necessary, but pulling exercises for the back, such as pull-ups, will be even more effective. Someone who has mastered heavy weighted pull-ups or even one-armed pull-ups will generally already be able to hold a full body. Front Lever
Where these people will have more problems, and this was the case for me, is that they will often find it difficult not to bend their arms too much.

Tip 4: Work on pull-ups and negative pull-ups
As always in Street WorkoutChoose the progression and body position best suited to your level.

For pull-ups, start by doing them in Tuck, then you can add a new progression beforeAdvanced Tuck with reverse L-Sit pull-ups. You can keep your hand position the same, but it will be easier with a false grip or a tighter grip. For these pull-ups, choose a progression where you can do sets of at least 5 reps.
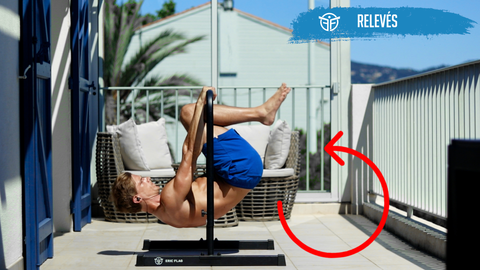
Let's move on to the negatives, which will be more interesting once you can start unfolding your legs. The principle is simple, but the exercise is difficult. Start at the vertical and work your way down to the horizontal, controlling the descent as slowly as possible.

Here, there's no momentum possible, which makes the exercise more difficult and will probably require less advanced progression to be able to do sets of 3 or 4 repetitions. For deadlifts, I've had good success using an elastic band. This allows you to familiarize yourself more quickly with the final position of the Front Lever while offering more assistance in the most difficult position, i.e. horizontal.

for learning the Front Lever
Tip #5: Use elastic bands to get his Front Lever
Avoid putting the band around your feet, as this distorts the movement and makes you want to bend at the hips. Place it in the same direction as the natural force, so that it opposes it directly and reduces it without changing anything else.
One final note about bands: be careful not to disengage your abs in return for their help, which would result in an overly curved back.

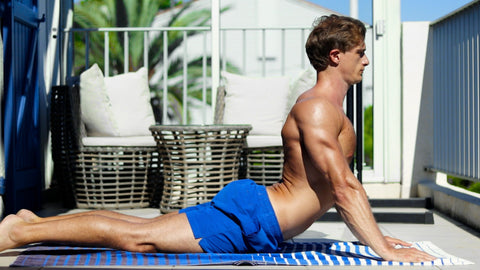
Tip #6: Correct mobility & flexibility issues
And speaking of curved backs, some curvature problems could stem from a lack of mobility, which is the subject of this sixth tip. When you tend to bend at the hips or legs, which is often seen in straddle and semi positions, it could come from a lack of mobility in the hips, buttocks and ischios.
To solve this problem, here are a few exercises I recommend to help you get back on track:

Tip 7: Use the GTG method
You can do these little exercises regularly, a little at a time, and without too much effort. Here's the seventh tip.
What I mean by this is that you can apply the GTG (Grease The Groove) method, which consists of doing a few low-intensity sets, one at a time, throughout your day, with plenty of rest in between. Of course, this often involves having a bar or something handy at home.
If you don't have one, I recommend the bar I designed myself after many prototypes. It's wide, stable and adjusts to four different heights, offering impressive versatility and quantity of exercises. It can support loads of up to 120 kg without losing stability. The Levitate Bar will be your best training partner!
Tip #8: Create your routine Front Lever
Moving on to the eighth tip: establish and follow a specific routine for the Front Lever. Include 2 or 3 exercises related to this figure, choosing from isometrics, pull-ups, deadlifts and negatives.
Repeat this routine, measure your progress and develop it further. Ideally, fit all this into a session dedicated to back and abs, with accessory exercises such as pull-up variations or leg raises. The more Front Lever is a priority, the more predominant and regular it will be in your sessions, and the faster you'll reach it. But you can also give it less space if you have other objectives in parallel.
Finally, to vary your routines, here's a selection of additional exercises. Different people find different exercises effective, so maybe one of these will give you the little push you need.

To conclude, I'll give you 2 last mini tips that won't really help you get stronger, but will improve you immediately!
Having heavy legs will complicate the process, as will doing your Front Lever only on a high bar. So, to maximize your score, take off your shoes and do it on a low bar. You'll probably save a few seconds, and that's always nice.
I wish you every success in all this. I hope you found something useful in this article.
You can also see the video version of Front Lever.
Take care of yourself! ✌️
Eric Flag


4 comments
You're a monster Eric
Don't 🫶 forget it
Chopsdo
Thanks for the advice Eric, you're a lifesaver as I didn't really know how to progress and being my goal, calisthenics and not power (although I'd probably do power for mass) I thank you enormously.
Enzo Carucci
Here to learn
Imoh
Great skills thanks 👍
Tony
Leave a comment
This site is protected by reCAPTCHA, and Google's Privacy Policy and Terms of Service apply.