Front Lever : 8 Conseils Pour (enfin) L'Obtenir !
Salut à toi, et bienvenue dans ce nouvel article ! 😄
Après avoir rédigé un article sur "Comment réussir le Back Lever ?", nous allons aborder une autre figure emblématique du Street Workout : le Front Lever.
Le Front Lever est une figure qui fait rêver de nombreux adeptes de musculation au poids du corps. Ce rêve est facilement entretenu lorsqu'on essaye pour la première fois et qu'on réalise à quel point cela semble impossible.
C'est ce qui s'est passé pour moi. Ce fut long et douloureux d'en arriver là où j'en suis aujourd'hui. Je te propose donc cet article avec mes meilleurs conseils dans l'espoir de te faire gagner un peu de temps.
Mais sans plus tarder, place aux 8 conseils 💪 :
Conseil 1 : La bonne position des mains/épaules pour le Front Lever
Pour les mains et pour tenir une position statique, je te recommande d'utiliser ce qu'on appelle un "strong grip".
Cela consiste à garder les poignets environ à hauteur de barres et à choisir la largeur de prise qui te semble la plus facile. Souvent, cette prise sera un peu plus serrée que la largeur des épaules.


Deux points supplémentaires importants : serre la barre autant que tu peux et tire-la au maximum. Attention, ne la tire pas directement vers le bas, mais plutôt vers le bas et vers l'extérieur en même temps, comme si tu voulais déchirer la barre. Allez-y franchement ! La barre ne risque rien.
Ce dernier point te permettra d'activer encore plus ton dos et d'utiliser toute la force dont tu es capable. C'est le même principe qui explique pourquoi tu soulèves plus de poids au développé couché à la barre plutôt qu'aux haltères, car tu peux pousser la barre vers l'extérieur, alors qu'avec les haltères, tu ne peux pousser que vers le haut.


Une position neutre ou légèrement vers l'avant, qui te permet de contracter et d'abaisser les omoplates, est la meilleure. C'est celle où tu te sentiras le plus fort, car elle maximise l'activation des muscles du dos, qui vont soutenir une bonne partie de la charge tout en gardant une ligne assez esthétique.


Tu peux bien sûr te filmer pour avoir une meilleure idée de ta posture. Si tu as du mal à empêcher tes épaules de partir trop en avant, c'est probablement parce que tu manques encore un peu de force.
Conseil 2 : Utiliser les progressions isométriques
Je te montre ici la liste de mes préférés par ordre croissant de difficulté.
Tu trouveras une indication du temps que je te conseille de tenir avant de passer à la suivante :


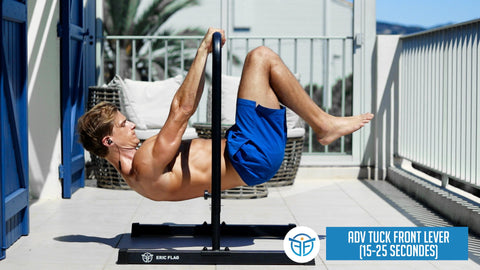


Cela peut rendre l'exercice beaucoup plus facile qu'une position plus objective comme l'Advanced Tuck à une jambe. En plus, cela casse la ligne du front lever en mettant le corps en position de cuillère, ce qu'on veut clairement éviter.
Cela donne un faux sentiment de progression. Si tu plies bien la jambe, cela peut devenir plus facile que l'Advanced Tuck, mais en réalité, tu es tombé dans un piège.

Tu l'as compris, donc je te le déconseille. Mais si tu as l'impression d'être coincé à l'Advanced Tuck, que tu tiens déjà longtemps, mais que tu n'as pas encore la force de tenir le Straddle ou le semi front lever, il y a des solutions.
Tu peux essayer de combler l'écart en ouvrant encore davantage tes hanches lors de ton Advanced Tuck. Tu peux aussi mixer le Straddle et le semi front lever pour trouver une progression intermédiaire que tu puisses déjà tenir un peu.

Ceux-ci sont les progressions classiques les plus importantes, mais il y a d'autres exercices importants et efficaces qu'on verra juste après 🔥
Conseil 3 : Travailler plus le dos ou les abdos ?
Jusqu'à présent, j'ai surtout parlé de ton dos. Le conseil numéro 3 concerne un petit débat autour du Front Lever : est-ce que ça travaille plus le dos ou les abdos ?
Clairement, c'est le dos qui fait la majorité du travail et qui te limitera presque toujours. Pour cette figure, maîtriser les relevés de jambes suspendus est nécessaire, mais les exercices de tirage pour le dos, comme les tractions, seront encore plus efficaces. Quelqu'un qui maîtrise bien les tractions lestées lourdes ou même les tractions à un bras pourra généralement déjà tenir en Front Lever complet.
Là où ces personnes auront plus de problèmes, et c'était mon cas, c'est qu'elles auront souvent du mal à ne pas trop plier les bras.

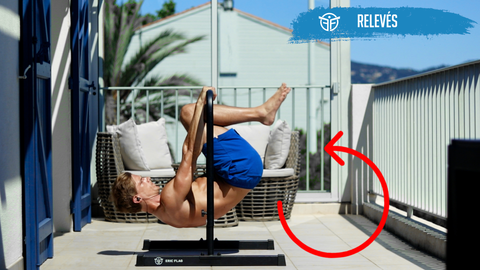
Conseil 4 : Travailler les tractions relevés et négatives

Pour les tractions, commence par les faire en Tuck, puis tu pourras ajouter une nouvelle progression avant l'Advanced Tuck avec les tractions en L-Sit inversé. Pour la position de tes mains, tu peux garder la même, mais ce sera plus facile avec un false grip ou une prise plus serrée. Pour ces tractions, choisis une progression où tu peux faire des séries d'au moins 5 répétitions.
Passons aux négatifs, qui seront plus intéressants à partir du moment où tu pourras commencer à déplier tes jambes. Le principe est simple, mais l'exercice est difficile. Commence à la verticale, puis redescends jusqu'à l'horizontale en contrôlant une descente aussi lente que possible.

Ici, il n'y a aucun élan possible, ce qui rend l'exercice plus difficile et nécessitera probablement une progression moins avancée pour pouvoir faire des séries de 3 ou 4 répétitions. Pour les relevés, j'ai eu pas mal de succès en utilisant une bande élastique. Cela permet de se familiariser plus rapidement avec la position finale du Front Lever tout en offrant plus d'assistance dans la position la plus difficile, c'est-à-dire à l'horizontale.

pour apprendre le Front Lever
Conseil 5 : utiliser des bandes élastiques pour obtenir son Front Lever
Évite de mettre la bande autour de tes pieds, car cela dénature le mouvement et donne envie de plier aux hanches. Place-la dans la même direction que la force naturelle, de façon à ce qu'elle s'y oppose directement et la réduise sans rien changer d'autre.
Une dernière note au sujet des bandes : fais attention à ne pas désengager tes abdos en contrepartie de leur aide, ce qui entraînerait un dos trop courbé.

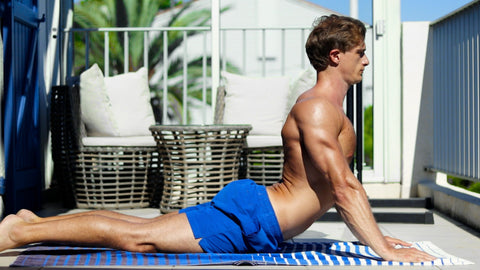
Conseil 6 : corriger les problèmes de mobilités & souplesses
Et en parlant de dos courbé, certains problèmes de courbure pourraient provenir d'un manque de mobilité, ce qui est l'objet de ce sixième conseil. Quand tu as tendance à plier aux hanches ou aux jambes, ce qui se voit souvent dans les positions en straddle et semi, cela peut venir d'un manque de mobilité dans les hanches, les fesses et les ischios.
Pour régler ce problème, voici quelques exercices que je te conseille et qui pourront t'aider à te remettre dans le droit chemin :

Conseil 7 : Utiliser la méthode GTG
Tu peux faire ces petits exercices régulièrement, un peu quand tu veux et sans trop forcer. Voici le septième conseil.
Ce que j'entends par là, c'est que tu peux appliquer la méthode GTG (Grease The Groove), qui consiste à faire quelques séries peu intenses, une par une, tout au long de tes journées, avec beaucoup de repos entre chaque. Bien sûr, cela implique souvent d'avoir une barre ou quelque chose sous la main chez toi.
Si tu n'en as pas, je te recommande la barre que j'ai conçue moi-même après de nombreux prototypes. Elle est large, stable et s'ajuste à quatre hauteurs différentes, offrant une polyvalence et une quantité d'exercices impressionnants.
Elle peut soutenir jusqu'à 250 kg de charge sans perdre en stabilité. La Levitate Bar sera ton meilleur partenaire d'entraînement pour constituer ton home gym !
Conseil 8 : Créer ta routine Front Lever
On passe au huitième conseil : établir et suivre une routine spécifique pour le Front Lever. Inclue 2 ou 3 exercices liés à cette figure, en piochant parmi les exercices isométriques, les tractions, les relevés et les négatifs.
Répète cette routine, mesure tes progrès et fais-la évoluer. Idéalement, caser tout ça pendant une séance dédiée au dos et aux abdos, avec des exercices accessoires comme des variations de traction ou des relevés de jambe. Plus le Front Lever est une priorité, plus il sera prédominant et régulier dans tes séances, et plus vite tu l'atteindras. Mais tu peux aussi lui accorder moins de place si tu as d'autres objectifs en parallèle.
Enfin, pour varier tes routines, voici une sélection d'exercices supplémentaires. Chaque personne trouve des exercices différents efficaces, donc peut-être que l'un d'eux te donnera le petit déclic nécessaire.

Pour conclure, je te donne 2 derniers mini conseils qui ne vont pas vraiment t'aider à te renforcer, mais qui vont t'améliorer immédiatement !
Avoir des jambes lourdes va compliquer le processus, tout comme faire tes Front Lever uniquement sur une barre haute. Donc, pour maximiser ton score, enlève tes chaussures et fais-le sur une barre basse. Tu pourras probablement gagner quelques secondes, et ça, c'est toujours agréable.
Je te souhaite énormément de succès dans tout ça. J'espère que tu as trouvé quelque chose d'utile dans cet article.
Tu peux également voir la version vidéo du Front Lever.
Prends soin de toi ! ✌️
Eric Flag


5 commentaires
Nickel tes conseils ça m’a beaucoup aidé
Logoby
T’es un monstre Eric
Ne l’oublies pas 🫶
Chopsdo
Merci pour les conseils Eric , vous me sauvez la vie car je ne savais pas vraiment progresser et étant mon but , la calisténie et non le power (bien que je ferais surement du power pour la masse) je vous en remercie énormément.
Enzo Carucci
Here to learn
Imoh
Super les skills merci 👍
Tony
Laisser un commentaire
Ce site est protégé par hCaptcha, et la Politique de confidentialité et les Conditions de service de hCaptcha s’appliquent.